Thursday, October 10, 2013

A Short Retreat

View of Mt. Washington over Lost Pond in New Hampshire's White Mountains.
Every July or August, my husband and I are lucky enough to get a short respite from parenting while our mothers watch the kids and we escape to New Hampshire's White Mountains to celebrate our wedding anniversary (12 years this year!). We normally stay in Jackson and do a little hiking and a lot of relaxing. This year we ventured north and hiked some unfamiliar trails -- but they were so rewarding that we couldn't believe we'd never tried them before. We'll definitely be back with the kids (inevitably we spend portions of our vacation thinking about how much fun it would be to come back with the kids).

The larger of the two beaver dams
One morning we headed to the Pinkham Notch Visitor Center and embarked on the Lost Pond Trail. It's a relatively flat trail that (predictably) hugs one side of Lost Pond. We were looking for easy hiking this year because baby #4 is expected to arrive in November, and I'm not feeling super energetic these days (that is also why this post is so long overdue). Unfortunately, that also meant that I left my foraging books behind (I didn't want to carry a backpack in addition to a baby), and so I was unable to identify several interesting plants we came across. Next year we'll have to go back with the books (see the Photo Gallery and below for pictures of some of the plants I couldn't identify).

As we made our way around the pond, we saw two beaver
A beaver has been here!
dams and many signs of recent beaver activity. We stopped to sit on a large rock at the water's edge and take in the view of Mt. Washington for a few tranquil minutes. Then we followed the trail past the pond and through a field of boulders left by a glacier during the ice age (the picture of the boulder field didn't do it justice, so I haven't included it).

Glen Ellis Falls.
After the trail left the pond and the boulder field, we took a short detour to view Glen Ellis Falls, which drops an impressive 64 feet and was probably created by a series of avalanches. We descended by way of a picturesque stone staircase, which paused at a couple of lookouts along the way. Tall stone walls enclosed each lookout so that visitors wouldn't accidentally plunge to their deaths at the bottom of the falls below. Still, because of limited visibility from the trail, it was hard to get a good idea of what the falls were like until we reached the bottom, and the sudden view of 64 feet of falling water was unexpectedly, awe-inspiringly magnificent. According to one of the stone signs along the trail, so much water rushes over the falls each day that it could meet the daily needs of a city of 25,000 people.

My husband carefully plots his route across the Glen Ellis River.
After climbing back up the staircase and resuming our original route, we came to a river crossing just before the trail entered a tunnel under Rt. 16. I was thrilled to be wearing my new Keen hiking sandals, which I purchased after getting water-logged boots during several river crossings on our last camping trip. While my husband searched for
My new Keens in the river.
suitable stepping stones and boulders to aid his crossing, I just waded through at my leisure. The Keens have toe protection, essential for hiking, but are also water shoes. At approximately 1 lb, they're a little heavier than is ideal for taking along on a backpacking trip, but if they avoid my having to hike in soggy socks and boots if we meet watery conditions, they're worth it!

Possible elderberry bush with unripe berries.
After the river crossing and our passage through the Rt. 16 tunnel, our trail ascended a ridge. From time to time we could peek out of the trees and see how high we'd climbed. At one such lookout I noticed an interesting tree with bunches of unripe green berries hanging over the edge of the cliff. I thought they might be elderberries but wasn't sure without my guidebook. Interestingly, I planted elderberry bushes in my front lawn, so you'd think I could recognize them! We don't get nearly enough sun for elderberries, though, and the berries have been small and sparse -- our bushes don't droop like this under the weight of the berries (see the Photo Gallery for pictures of our bushes). And I still haven't seen elderberries on the bushes that were under the power lines in my town -- last year the birds got to them before I did, and this year the bulldozers got there first (the hazelnut bushes are largely depleted as well; apparently the electric company has some big project going on).

Once we reached the visitor's center again, we stopped at the Joe Dodge Lodge run by the Appalachian Mountain Club and inquired about rates and even took a tour of some of the rooms. The lodge is much fancier than the Greenleaf Hut, where we stayed on our July backpacking trip, and the rates are a little cheaper -- which stands to reason given that the Greenleaf Hut is off the grid and located 1 mile below the top of Mt. Lafayette and the Joe Dodge Lodge is easily accessible from a parking lot along a major road. We thought it might be fun to take the kids on a trip where we started out in the White Mountains instead of having to pack up and drive 3 hr to get to the trailhead, though. So we're filing this information away for future use.

My husband kayaking down the Saco River.
On the third and last day of our short vacation, we rented kayaks and took a paddle down the gentle Saco River. The river is wide and winds along around many sandy beaches perfect for picnicking or just taking a break. Along the way I saw some sunflowers that I thought might be my first wild Jerusalem artichokes (I have cultivated ones in pots in my garden). I didn't try to dig up the tubers (the part you eat) because the plants were growing on a steep bank, and even without trying to dig, I was at risk of toppling into the river. I took some pictures so I could try to identify them later, but unfortunately the pictures of the
Jerusalem artichokes? I didn't have a shovel,
and they were growing on a steep river bank, so
I didn't dig one up to see whether it
had a tell-tale tuber.
stems were blurry, so I can't tell whether they were hairy or not (Jerusalem artichoke stems are very hairy).  I waited much too long to look at the pictures after we got home, so my memory is doing me absolutely no good. I'll have to categorize this as one more unidentified plant on our trip.

Now I'll leave you to the Photo Gallery, where you can see more unidentified plants and a little more beautiful White Mountains Scenery.


Photo Gallery 

Another view from the Lost Pond Trail.


And another.


 There were a lot of bunch berries around Lost Pond and Glen Ellis Falls. I nibbled on many as we walked along. They have a mild, apple-ish taste.
These are the elderberries I got from the plant in my garden. They're very small and sparse in comparison to pictures I've seen in books. I did pick this bunch and try a berry. You're supposed to get better results from cooking the berries (supposedly they make fabulous jam and wine), but my middle son and I both thought the raw berries tasted pretty good. I didn't get enough to do anything with them on their own, so I added them to some autumn-olive fruit leather. There were so few elderberries in comparison to the autumn olives that it's not possible to tell the elderberries are there, but maybe we're getting some small portion of their many health benefits.
I've no idea what this bush is, but I thought it looked interesting.
I thought this might be a chokecherry bush (the berries are still mostly green, whereas they'd be almost black when ripe).
Here's a close-up of the unripe berries.

And here's a close-up of the leaves. These look very much like the leaves in my foraging book, at least in this picture. I really wish I'd had my book along!
Here's a view of the stairs that led to and from the falls.


We liked these stairs so much that I took several pictures so we can remember how they looked, just in case we want to put stone stairs on our property some day.
Before we reached the real falls, we passed this smaller version. We thought it was quite nice until we saw the real deal.


Saturday, July 27, 2013

A Week of Wilderness

 We started at the Lincoln Woods Visitor Center. The green line shows our actual route (18.2 miles in all). The red line shows our intended route over the Franconia Ridge. The two paths diverge at the Greenleaf Hut (labeled blue dot). Peaks are not to scale.

Over the week of July 4th, my family embarked on our most ambitious backpacking trip to date, and our first of 2013. Normally, my husband, three boys, and I go out for three days and two nights, and we spend both nights at the same campsite because it takes us so long to pack everything up each morning (the boys – now 3, 5, and 7 but obviously at least a year younger on previous trips – traditionally have hindered rather than helped the packing process). By the time we get hiking after packing up camp, it's often nearly lunchtime! Last year the two older boys asked to go on a longer trip – maybe for a week – and promised to learn to pack up their own sleeping bags and hammocks.

We probably should have chosen a less challenging route for our first week-long foray into the wilderness, but we picked a loop starting at the Lincoln Woods Visitor Center off the Kancamagus Scenic Highway (Rt. 112) through New Hampshire's White Mountains. Our initial path is shown in green on the map above. We planned to hike around Owl's Head Mtn., up Mt. Garfield, and along the Garfield Ridge to Mt. Lafayette (elevation 5,249 feet above sea level) and then spend the fourth night at the Appalachian Mountain Club's Greenleaf Hut (labeled blue dot on the map), which is 1.1 miles down the other side of Mt. Lafayette. From the hut, we intended to hike across the breathtaking Franconia Ridge (which my husband and I have hiked a couple of times without kids) and end up back at the Lincoln Woods Visitor Center and our car.

The boys (and our springer spaniel) 1.4 miles
into our trip at the junction of the Osseo trail
(by which we would have returned if we
had completed our loop) and the
Lincoln Woods Trail, which we were following.
As usual, we got off to a later start than we intended, despite the fact that we'd spent the previous day (Saturday) packing. We thus didn't make quite as much progress the first day as we would have liked, but things weren't that far off track. We started by crossing a bridge over the East Branch Pemigewasset River and following the Lincoln Woods Trail and then the Franconia Brook Trail around the base of Owl's Head Mtn. We had a little rain during our hike and overnight on Sunday, but it was nothing too troublesome. As we neared our stopping point Monday night (still just a little behind schedule), however, the rain worsened, and our sleeping bags, hammocks, and clothes all got wet as we set up sleeping quarters. During the night, it poured as hard as I have ever heard it pour, and by the next morning our trail had turned into a running stream. The water level in the multiple rivers and brooks we had to cross along the way had risen to the point that the usual crossings were submerged; in one case, there was no choice but for my husband and me to plunge through knee-high water (in a strong current) with our hiking boots on (but at least the water wasn't thigh high, as fellow hikers heading in the reverse direction reported it had been just hours earlier). My husband carried our kids, their packs, and our dog (who wouldn't have been able to swim against the current) to the other side.

One of the lower-water-level brook crossings. We laid this log across the brook
and used it as a balance beam. Our dog watched my husband ferry gear across
so many times that she thought she'd try walking the log, too.
She got much farther than we expected her to, actually – on one attempt
I think she made it a couple of feet with all four paws on the log!
Needless to say, it was slow going, and we got severely behind schedule. It rained every night, so our gear never properly dried out, although we did spend one morning hanging things over a fire instead of making progress on the trail (I think we traveled less than 2 miles that day). On Wednesday night, we faced climbing the dreaded waterfall we'd heard had given other hikers so much trouble. Fortunately, by the time we reached it, torrents of water were no longer rushing over the falls, so it was possible for us to stay on the trail rather than bushwhacking around the sides as those before us had had to do. Nonetheless, it was definitely a challenging climb for little kids, not to mention for me (my fear of heights paralyzed me at a particularly vertical part close to the top, but my husband took my pack, and I managed to keep going). By that evening, the night of our hut reservation, we had only made it just below the top of Mt. Garfield. We sent word with another hiker (who, unencumbered by small children, would be making it to the Greenleaf Hut that day) that the hut staff was free to give our spots to other hikers and that we'd be showing up in the next couple of days.

The boys peeking out from behind a windbreak at the top
of Mt. Lafayette.
The daytime weather on Thursday, Friday, and Saturday was much improved. On Thursday, after a steep but short climb to the top of Mt. Garfield (where the clouds momentarily let up and we got a nice view), we finally got to drier conditions on the other side of the mountain. Bridges, always popular with our boys (and particularly with my 3-year-old, who made me recount The Three Billy Goats Gruff and hunt for mountain trolls for the vast majority of the trip), lined the trail around Garfield Pond, which lies along the ridge from Mt. Garfield to Mt. Lafayette. We camped just below tree line on Mt. Lafayette Thursday night, and on Friday we made it out of camp in record time and had climbed to the summit of Mt.
My two older boys descending the rocky trail
from the top of Mt. Lafayette to the Greenleaf
Hut, which is a small white speck at the left edge
of the picture (just below the bare rock on
the distant mountain).
Lafayette by 10:00. Again the clouds cooperated and afforded us a magnificent view of the rolling White Mountains extending in all directions. After a snack break at the top, we descended the rocky 1.1 miles (see picture) to the Greenleaf Hut, where we arrived in time to purchase lunch. Unfortunately, despite the messages we'd sent ahead with other hikers, the staff would not transfer our reservation, but at least they had space for us to spend the night.

After all our ordeals (and the parental worry over how long our food supply would last given that we were behind schedule), it was wonderful to relax at the hut, chat with other hikers, and have someone else do the cooking (and the food, by the way, was phenomenal – despite the fact that we were off the grid high in the White Mountains and that hut staff have to pack all supplies up and down the 2.7 miles from Lafayette Campground below). It of course rained again in the afternoon, and everyone had to hurry inside for a while, but we were rewarded by a magnificent double rainbow spanning the mountains once the showers let up (my picture below does not do it justice!). This was our first time staying at an AMC hut, but it probably won't be our last.

A portion of the double rainbow we saw from the hut.
On Saturday, because we had run out of time and almost run out of food, we descended by the Old Bridle Path to Lafayette Campground off Rt. 93 rather than traversing the Franconia Ridge and attempting to make it back to our car. Once descended, we called a hikers' taxi service and got a ride to our vehicle.

Although we didn't complete our intended route, and although we were all tired and waterlogged (you don't even want to know what happens to feet that have been walking in soggy boots for days), we felt very accomplished. If the adults had known ahead of time what trail conditions we would encounter – if we had known about the high-water river crossings, the stream-trail, the waterfall scaling, the downpours – we would certainly have thought our kids, accomplished hikers though they are, would not be up for the task. They surprised and amazed us with their stamina, positive attitudes, and resilience. And although we certainly faced some challenges and miserable conditions, we also had some fun times playing in mountain streams, taking in magnificent views, eating like royalty at the hut, and yes, even hunting for trolls (but I hope not to have to tell the story of the Billy Goats Gruff again for a long, long time).

Picture Gallery


My 3-year-old having a snack on the trail. His mother (who is that irresponsible woman?) decided against buying him a lightweight, backpacking-appropriate rain coat because he already has a perfectly good (although quite heavy) raincoat, so he wore this emergency rain poncho. It ripped in several places during the trip and had to be tied around him in knots.
My two older boys underneath some tree roots we passed on our descent out of the mountains. We were trying to figure out how the tree ended up like this.


Thursday, May 16, 2013

Violets, Maybe Morels, and Other Welcome Garden Guests

Common violets come in several colors. In my yard, we have mostly blue and purple but also white (shown here) and a few yellow violets. The leaves and flowers are edible and high in vitamin C, but the blue (really purple) violets have the most flavor. I think the white ones are prettiest.

Common blue and white violets by the side of my house.
I cannot believe I once pulled up the edible heart-shaped leaves of the common blue violet as a pesky weed that would just not leave my garden or yard alone. I didn't even let the plants get as far as making their pretty blue (or really purple) flowers if I could help it. For a long time I'm not sure I even realized that the plants made flowers. Then last year I came across a picture of a blue violet in an edible-plant guide. I stopped and stared in amazement at this "weed" that I'd been unsuccessfully trying to eradicate. You can eat that? And it's high in vitamin C and makes a good salad green? What?

Violets destined for jelly.
Needless to say, I'm not weeding violets any more; rather, I've let them take over. Whereas last year it was painstaking work to collect enough flowers to make half a batch of violet syrup (and I had to steal some flowers from my neighbor's yard), this year I had no trouble collecting enough for a full batch plus an additional 6 cups to make some violet jelly. I'm planning to experiment with using the syrup to flavor various baked items (last year I made some yummy coconut-violet cookies, but I didn't think I could taste the violet flavor).

Violet jelly.
The violet jelly turned out to be quite tasty, although the flavor of the added lemon juice overshadowed the violet flavor. I'm not entirely sure the floral tones came through, but I don't know whether the jelly would be acidic enough to can if I had reduced the amount of lemon juice. (The recipe I used was from The Green Kitchen, although I used fresh lemon juice instead of bottled.) The syrup, which has no lemon juice in it, definitely tasted of violets. I'd like to get a jelly that tastes a bit more like that. Still, the jelly I made was beautiful (the purple violet water turned pink when I added the lemon juice) and delicious.

The young leaves are least fibrous. Younger leaves are furled
or at least a lighter shade of green than the older leaves.
Yesterday I also collected a colander full of young violet leaves (still furled or at least shiny), cooked them for a minute in the water still clinging to the leaves after I washed them, squeezed out the liquid, and added the leaves to my usual spinach dip in place of the spinach (I use the recipe on the back of a packet of Knorr's vegetable soup mix but replace the sour cream with fat-free plain Greek yogurt). Yum! It was just as tasty as the dip made with spinach, and it was inconsequential that I had no spinach.

A pansy I grew from seed. Pansies are edible and made
beautiful candied decorations.
I tried making candied flowers for the first time this year. I think I need a little more practice because many of my flowers stuck to the wax paper and crumbled when I tried to lift them off after they'd dried. But many made it into an air-tight container, where apparently they'll still be good a year from now if I haven't used them yet. To candy the flowers, I brushed some beaten egg white carefully onto both sides of the flower with a paint brush and then sprinkled some sifted sugar all over the flower. I candied violets as well as some pansies I grew from seed and some Johnny jump-ups that re-seeded themselves from last year's garden (see the Photo Gallery below).

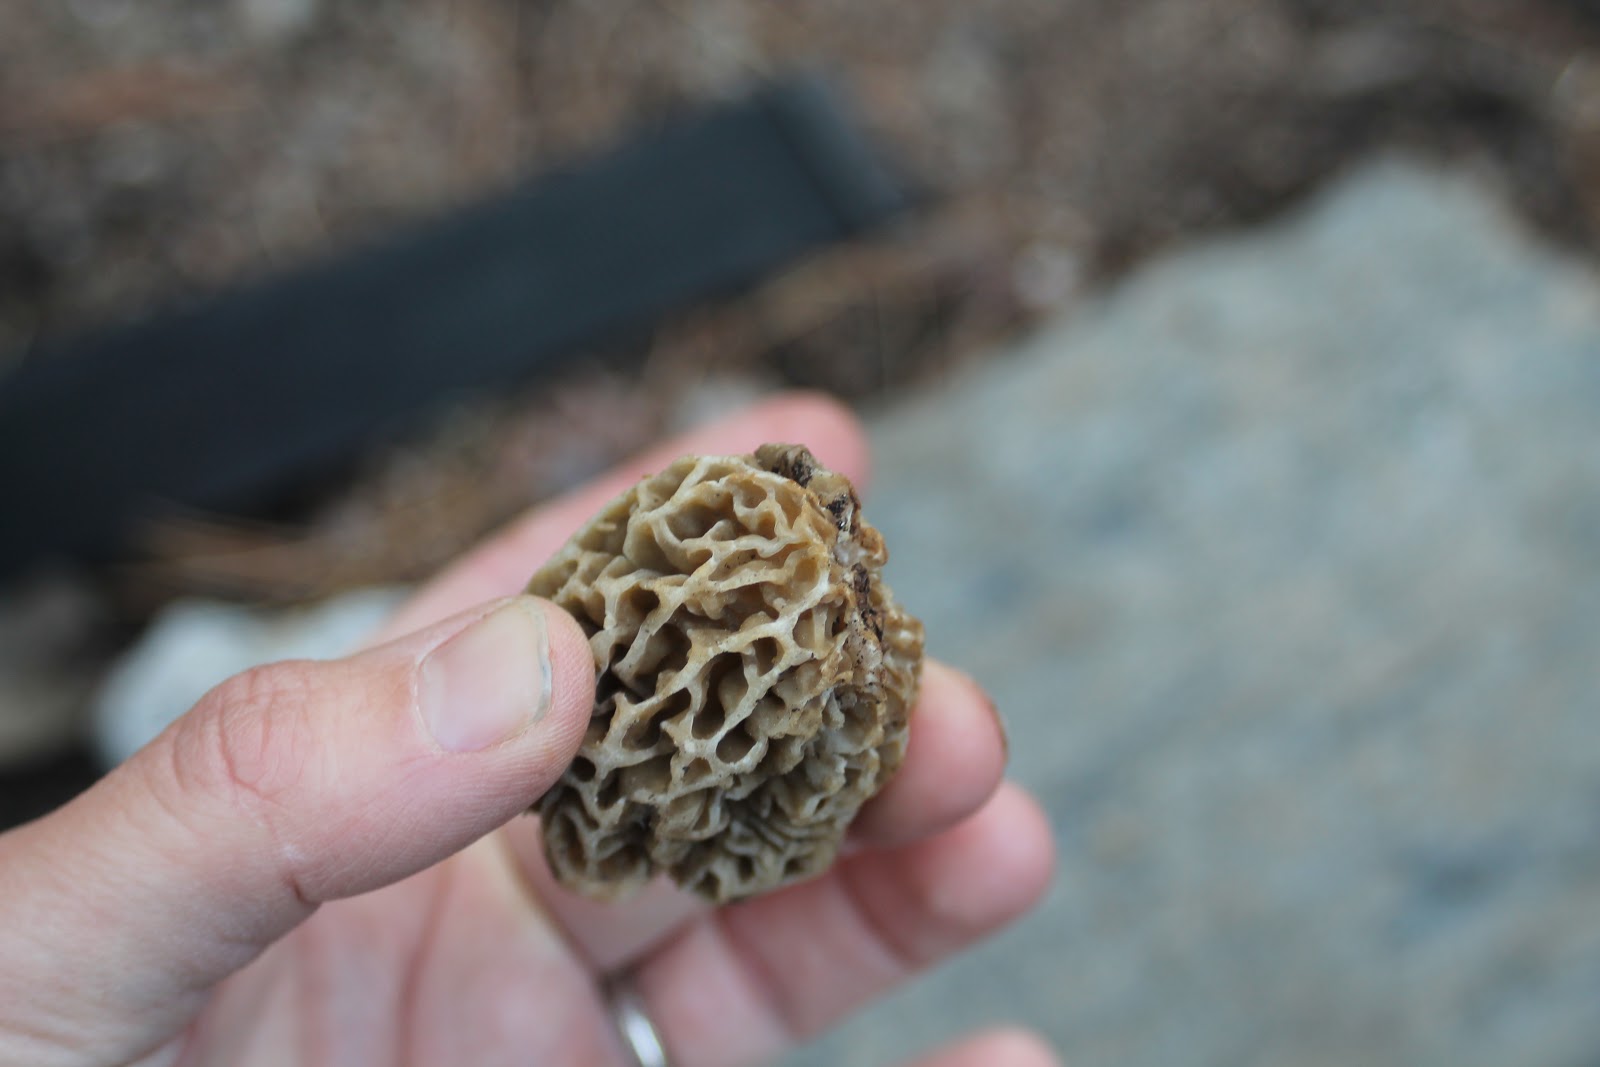
Possible morel mushroom. We had already sliced the mushroom
in half, so here I am holding it back together for the photo.
Notice the pits that cave in rather than bulging out.
Violets were expected garden residents, but my 7-year-old recently discovered a much more surprising one. I was showing him something in the garden the other night when he said, "Mom, what's that scary-looking thing behind that blue violet?" I looked and saw what at first I thought was a wasp's nest attached to a violet stem. But it seemed like an odd place for a wasp to build a nest. Upon closer inspection I saw that it was a mushroom, and I got quite excited because it looked an awful lot like a coveted morel mushroom! I admit that I haven't been crazy about morels when I've had rehydrated dried ones, but I know that morels are one of the most sought-after species, and perhaps a fresh morel would be more exciting. In any case, finding an edible mushroom growing right in my own yard would be pretty exciting regardless of taste. My son, who doesn't even like mushrooms as a general rule, obviously agreed. He was practically jumping up and down as he urged me to get my mushroom books.

Another view of our (pieced-together) mushroom.
According to my guides, morels usually come up about this time of year, and they often grow under rotting elms or apple trees but sometimes other hardwoods or in compost. This mushroom was growing under a white pine in a place where last year we had spread a bunch of compost, but we don't have any elm or apple trees there. So far so good, except that morels must not be confused with poisonous false morels, which apparently come up at about the same time and like to grow under pine trees. There are different types of false morels. Beefsteak (false) morels have more convolutions, like a malformed brain, whereas true morels are pretty much cone shaped. If you slice the mushroom open, inside a true morel you should see a completely hollow space (including the stem), whereas in a false morel you should see chambers or divisions from all the "brain" lobes. Also, beefsteak morels have convolutions that bulge out, whereas true morels have pits that cave in, just like a wasp's nest.

Verpa false morels look more similar to a true morel, at least to me. They have wavy ridges instead of true pits as the edible morel does. Also, the cap attaches to the stem at the very top (so the stem basically goes up inside the mushroom cap), whereas on a true morel the stem is attached at the base of the cap. If you slice the mushroom in half, a true morel should have one continuous wall from the stem all the way around the cap border. To see pictures to help with all this textual description, visit the Michigan Morel page.

Our possible morel sliced in half. Note the attachment
of the stem at the base of the cap and the hollow, non-divided
chamber lined with bumps.
We severed our mushroom at the stem and sliced it open longitudinally. It was hollow and not divided inside, and the inside of the cap was covered with little bumps, just as the guide book said it would be. Everything about the mushroom seemed to fit the description of a true morel -- but given that people have died from eating false morels and that we only had one specimen to examine (and maybe, I thought, if we had let it grow it would have developed chambers inside), we didn't eat it. I'm approaching my entrance into edible-mushroom hunting with great caution -- great excitement, but great caution. It's a lot easier to misidentify a mushroom than a plant, and taste is no guide as to whether one's identification was correct (which is not true for plants).

Violets and mushrooms are not the only interesting things popping up in my yard this spring. Last year I planted perhaps six Jerusalem artichoke tubers. Jerusalem artichokes are sunflowers with edible tubers.
I've never actually tasted Jerusalem artichokes, but I hope I like them because I've got a whole lot of
them now! I planted them in cardboard boxes placed in the soil last year because I knew I didn't want

The Jerusalem artichokes that came up after
my initial attempt to dig up all the tubers.
the location to be permanent, and I wanted to know where I'd planted them later (we don't really have a good, sunny location for sunflowers at our house, but we're building a home that will have a lot more sun). It turns out that my box idea wasn't very effective; my middle son and I dug up quite a few tubers from around where the dead stalks were this spring, and not all of the tubers were within the confines of a box. We thought we had dug them all up, but recently a lot of Jerusalem artichoke sprouts began popping up within a few feet of the original planting spot. And I do mean a lot. I didn't count the tubers, but I'm sure there were at least 40 of them. Fortunately, I could now see where the tubers were because they were sprouting, so my eldest son and I spent a good part of an afternoon digging them up. Some were the size of small pebbles, and others were more the size of sweet potatoes. I think we dug them all up, but I'll be keeping a vigilant eye on that section of the yard for a while. I read somewhere that the only sure way to rid oneself of Jerusalem artichokes is to move away from them.

My planters full of Jerusalem artichokes. This was the
second round of planting -- I had already filled
up two other planters (see Photo Gallery).
Of course, my plan is not to move away from them but with them. To that end, I planted many of the tubers in whatever large pots I could find. The problem was, I still had a good deal of tubers left over. I obviously don't really need so many tubers to start my own little Jerusalem artichoke jungle (given that six turned into 40 or so in just one year), but I didn't want to throw them out somewhere they might take root, either. I thus put them in a gallon-size ZipLock bag with a few handfuls of dirt and put the whole thing in the freezer. I have no idea whether this will work -- during a real winter, the tubers are insulated by a lot more soil. But I figure I've either successfully killed the tubers or saved them for a time when I have enough space and sunlight to grow them. And believe me, I'll be choosing my location carefully because I probably won't be able to change my mind later!

Note the two leaves and the tiny
flower bud on the front plant.
I've also discovered three additional mayflower plants since my last post. That's a total of six, and one has sprouted a second leaf and is making a flower! Plants with one leaf don't fruit; a second leaf is a sign that a flower is on the way. I'm considering putting a little cage around the two-leaved one to make sure I, and not the wildlife, get to sample the resulting fruit. See my previous post for more about mayapples.

Our one lone lilac flower cluster.
Another exciting discovery was that the sickly lilac bush I purchased from a local nursery at great discount many years ago and planted "temporarily" in an unsuitably shady spot in my backyard has made a flower cluster for the first time ever. I wasn't sure it would ever produce flowers and was wondering whether it was the lack of sunlight or the lack of neighboring lilac bushes, or both, that was the contributing factor (now I'm guessing it's the lack of sunlight because I haven't recently acquired any additional lilac bushes). I've just discovered that lilacs are edible and make nice flowers for candying, so that's an added bonus. My plan had always been to dig up the bush and move it to a sunnier location, and now I guess my plan is for that sunnier location to be at our new house this fall, but the bush has grown considerably since I planted it, so I'm not at all confident I'll be able to dig it up and move it without causing fatal damage. Fingers crossed.

Young lady's thumb plant. You can just see the beginning
of the characteristic "thumb print" on the largest leaf. A young
wild-spinach plant is poking up from the bottom of the picture.
You might remember from an earlier post that I've been redesigning my front-yard garden and scaling down last year's efforts to a few well-defined planting areas. I'm planning to seed grass outside of these areas, but I'm having trouble taking that plunge because so many delicious edible "weeds" are growing in abundance where I'm planning to put the grass. We have a lot of wild spinach and lady's thumb, for example, and I'd like to collect a good harvest before hoeing it all under. I recently purchased a vacuum sealer to improve my ability to freeze and preserve my harvest, and I have visions of bags and bags of frozen wild spinach. Fortunately, much of the lady's thumb, whose delicate pink flowers I find quite attractive, is growing within the designated "garden" space and won't need to be eradicated.

In closing, I'll report on the results of the experimental dandelion-bud and wintercress quiche that I mentioned was on the horizon in my last post. It got rave reviews from all luncheon attendees! I also made a quiche with stinging nettle, and that was good but was awarded second place.

Photo Gallery


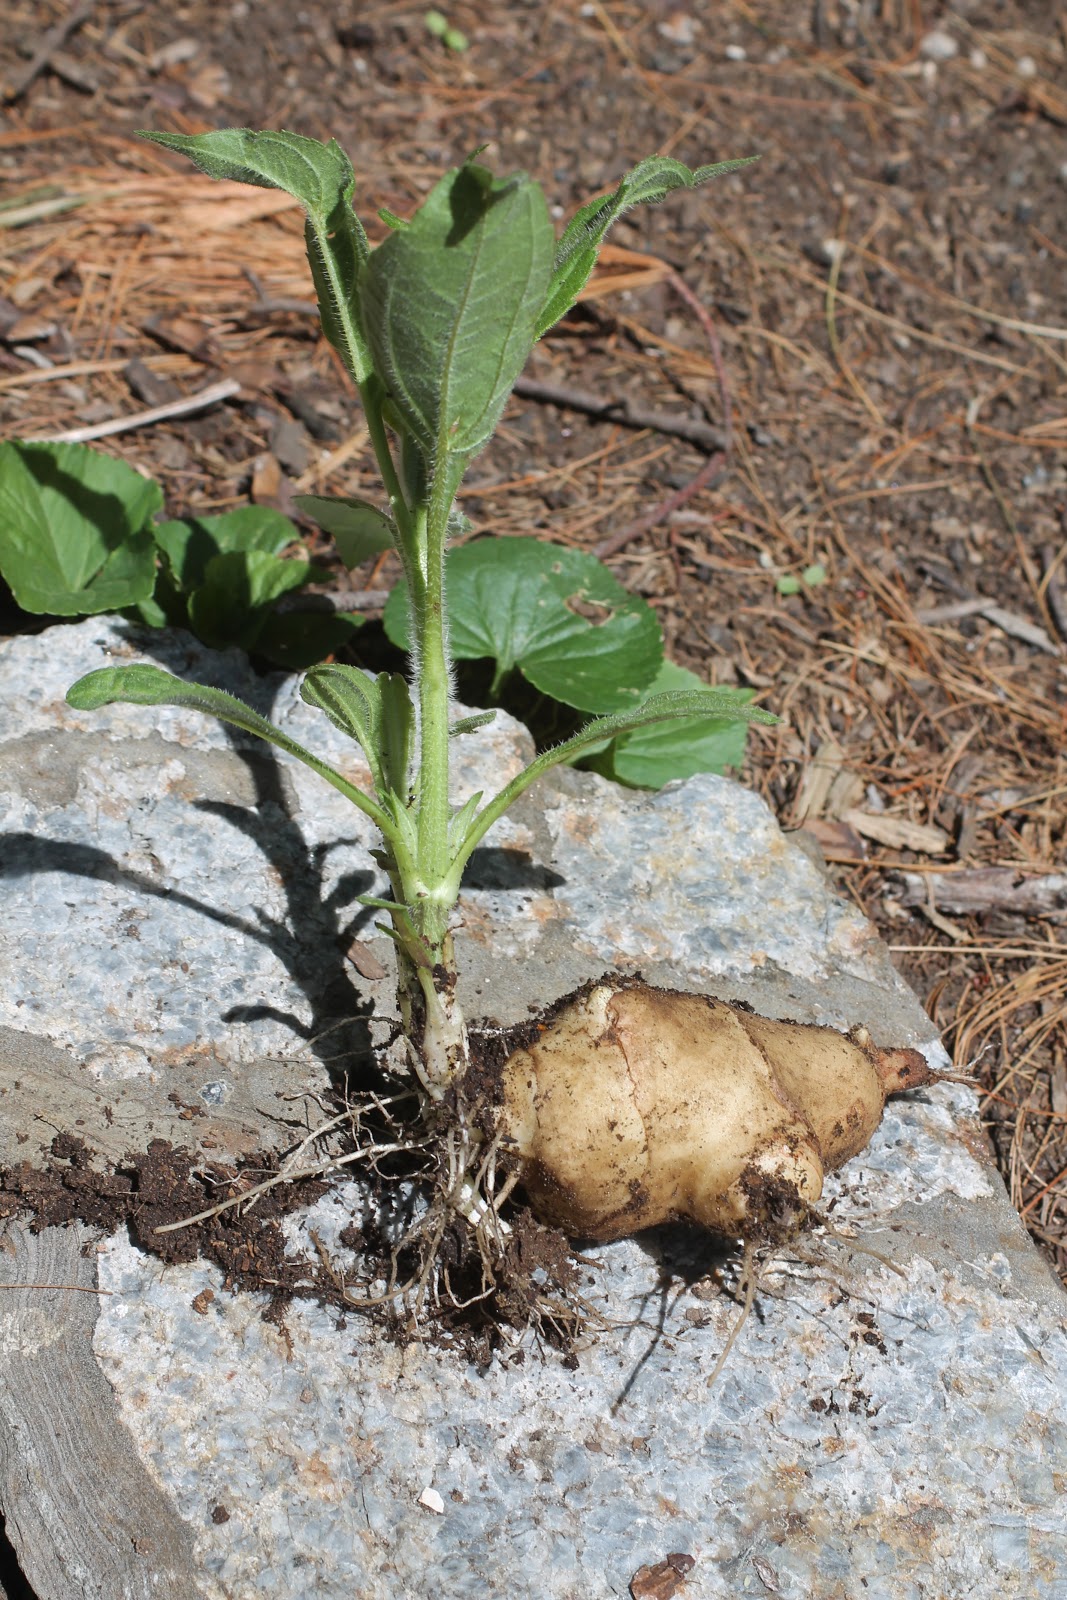
One of the many Jerusalem artichoke tubers we dug up.
I planted the initial harvest of Jerusalem artichokes along with some scarlet runner beans in two of these planters. The idea was that the bean vines would climb the sunflowers (Jerusalem artichokes), but so far the growth rate of the beans so far has outpaced that of the sunflowers, so I might need to revise my plan.

These Johnny jump-ups freely reseeded themselves from the flowers I planted last year. I've been moving them from their random spots around the yard to the borders of my garden beds. I candied some of these.

All six surviving mayapple plants. I can't remember how many I transplanted last year, but I think this might have been all of them. The one that has made two leaves is on the top right. Plants that will make a flower (and hence a fruit) grow two leaves instead of one.
Stinging nettle I transplanted from a nearby community garden (not from a garden plot, of course). It's in a pot so I can move it with us to our new house. The stingers cease to have any sting as soon as the plants come in contact with boiling water. I boiled the nettles and used them in a quiche, and I froze the nettle broth for later use. Nettles are high in a number of nutrients, including iron, potassium, sulfur, and vitamins A, B, and C. Apparently they are good for your garden, too (I plan to read more about the uses of nettles when I order 101 Uses for Stinging Nettles by Piers Warren).
I saw the idea for this colorful beach-bucket strawberry tower in a book I got out of the library (I can't remember which one now). I planted some green onions among the strawberries in hopes of keeping the chipmunks and squirrels away from my berries (they don't like the onions).
Yellow violets are not as common as purple ("blue") and white, at least in my yard.


Tuesday, April 23, 2013

Better Late Than Never

Finally, spring is here! Autumn-olive buds are sprouting.
The other day I was checking out my posts from April last year to see what plants I was gathering, and I was amazed at the difference between then and now. Sumac, wild spinach, mallow, lady's thumb, and pokeweed were all coming up. I was making wild salads and strawberry-knotweed pie, and the wintercress was already in flower. This year, I just collected my first Japanese knotweed shoots last weekend, and those were hard to come by. The only other wild foods I'd collected before last week were roots and tubers, which are available through the winter as long as the ground is workable. Spring is here, but it hasn't been in any rush.

Thistle root core (bottom) and fibrous outer root.
One root I tried for the first time this spring is thistle. Last year I collected plenty of thistle stalks, which taste kind of like celery and were good in soup. I have read that the roots taste similar to burdock (of which I've also only eaten the stalks) but are better. My older son and I dug up some thistle roots from a weedy spot by a soccer field down the road from our house, and once back home I peeled the outer root away from the core. This was much easier than I'd been led to believe it would be; the outer portion basically just slipped off once I got things started. The outer portion is apparently fibrous, whereas the inner core is not. I found the taste mild and promising, but we hadn't collected enough roots to actually cook anything.

Our collection of primrose roots. We
also found a lot of worms when we
dug up the roots (see picture in the
gallery below), and the boys insisted
on collecting those, too.
Another root I've been collecting is evening primrose. My older two boys and I came across a plethora of primrose rosettes growing by a netless soccer goal at our middle school. You might recall from my previous accounts of this vegetable that it causes the back of my throat to feel slightly itchy. I know it's not just me: I've read other reports of the same effect. My first attempt at eating evening primrose (I roasted it) was an outright failure, but I subsequently made some fairly tasty veggie fritters (see my October 12, 2012 post). The fritters still gave me that mildly itchy feeling, though. Lately I've been reading a lot about how to get rid of bitterness from certain wild greens (it mostly amounts to boiling them, sometimes in multiple changes of water, which is a novel cooking technique for me; I normally steam, broil, or sauté my vegetables), and I wondered whether boiling the primrose roots would carry off some of the itchiness. So I peeled, diced, and boiled my roots in a little salted water before adding them to a risotto recipe in place of the called-for parsnips. And lo and behold, the result was practically itch free and delicious!

At the same time last year, this
wintercress plant would have had
yellow flowers already.
Next I tried boiling some wintercress buds. I didn't have much to work with, so this was more of a taste experiment than a culinary endeavor. The last (and only) time I'd tried wintercress buds had been a truly memorable experience, and not in a positive way. As I recall, I made some loud and adamant protestations and spat out the offending buds. I truly did not think I would ever try them again, but it has since come to my attention that my chosen method of cooking -- broiling -- probably concentrated rather than dampened the bitter components. Boiling, once again, seems to have had a positive effect on the flavor. I can't claim that the buds weren't still bitter, but I swallowed -- and believe me, that's a big improvement. Furthermore, I think this vegetable -- high in nutrients -- might make a good addition to a quiche, which I plan to actually try out on some unsuspecting guests after a foraging walk I'm leading next weekend (I hope none of them are reading this post ... no, just kidding. I promise to taste the quiche first and make sure it's as tasty as I think it will be).

Curly dock is one of
the "weeds" I'll be relocating.
I do think we're finally moving beyond root season, though. Plants are certainly sprouting in my yard, which again is under reconstruction. Recently I confessed to having undertaken a crazy whole-lawn gardening experiment last year. Although I learned a lot and grew a lot, the scale of the project was definitely a bit larger than it should have been. So this year I'm scaling back and creating gardening spaces around the edges of my lawn. I've created rock and log borders and will plant grass everywhere not enclosed by the rock walls. This means I'm having to move any of last year's plantings and any fortuitous edible "weeds" that don't currently fall within the designated gardening areas. Yes, this is a lot of work, but I'm having fun with it and still learning a lot.

Two of the three surviving mayapple plants.
Part of the process is thus waiting to see what comes up before I plant my grass seed. I was beyond excited to see three tiny mayapple plants sprouting their little umbrella-like leaves last week! Mayapples do not grow natively in Massachusetts, although they like it here and do well if transplanted (I have seen a sizable stand of them on an organic farm). So when I came across a patch of mayapples on a camping trip in New Jersey last year, I brought a few of the plants (the ones growing in the path, which would have been trampled anyway, I reasoned) home. They did not seem to have adjusted to their new home satisfactorily last year, so I wasn't sure they'd come up again this spring. One of them hasn't, but the others, well, here they are! Unfortunately, they fell within the future grass area, so I had to move them. I put them in pots so I won't have to transplant them again when we move (in the fall, I hope). Unfortunately, I failed to water them sufficiently on the days following the initial potting, and they were looking a bit sad yesterday afternoon. In a panic, I brought them lots and lots of water and moved them to a shadier location. Today is fortunately a bit drizzly anyway, so I'm hoping for a full recovery. I've never eaten a mayapple (they weren't ripe when I found them in New Jersey), but from what I understand, it will be worth another trip to New Jersey if these plants don't survive my efforts to confine them to containers.

The blue violets are making an appearance.
So spring is here; my garden is starting to wake up, the heart-shaped leaves of the common blue violets are unfurling, the garlic mustard is out (we've already had tortellini with zucchini, tomatoes, and garlic-mustard pesto for dinner), and the Japanese knotweed is poking up. It was a long wait, but spring is all the sweeter for it. Ahhh.


Photo Gallery

My middle son with the worms we collected along with our evening primrose roots.
My eldest son digging up a thistle.

Two thistle rosettes. You only want to collect roots from rosettes, not plants with stalks. Once the plant has sent up a stalk, the root has used up its energy and will be tough.
Thistle overturned to show the root.

We found a great place to collect pokeweed when it comes up. This embankment has a row of dried-up pokeweed stalks sprawling like giant spiders along its edge. My eldest son is collecting trash, which is one of his favorite pastimes. He's become even more enthusiastic since he recently learned that he can get money for some types of cans and bottles at those recycling machines at grocery stores.

Near the pokeweed bank were these dried yellow fruits. I have no idea what they are, but they looked interesting. I'll have to come back in the summer and see what plants are growing here. I'm guessing they're not edible given that the animals haven't eaten them.
Close-up of the yellow mystery fruit.
In the same area were countless dried milkweed pods; so this promises to be a good collecting ground!


Sunday, March 3, 2013

Please Send Spring My Way!


Winter has finally arrived: it has snowed four weekends in a row, including today. After a snowless season last year, I'd been hoping and hoping for snow -- and itching to dust off our cross-country skis. After the first sizable snowfall, my older two boys and I took our skis to a local trail, where I shoveled out the parking spot at the trailhead (having lacked the foresight to consider that trailheads would not be plowed by the town, I had to drive back home to get a shovel the first time, but nevermind). The snow had just finished falling, and we were the first ones to make tracks. The woods were beautiful and peaceful under their new blanket of snow -- that is, until my older son's repeated meltdowns every time he fell disturbed the silence (note to self: make sure children have eaten sufficient lunch and have had sufficient sleep before allowing them to go skiing). My middle son did fine until we stopped for a snack, which he ate with his mittens off. It was a bitingly cold afternoon, and he never got his fingers warm again (the hand warmer my husband had given him seemed to be a dud). The entire trek back was marked by constant wailing: "I'm soooo cooooold! My hands are soooo coooold!" And don't think my oldest son's complaints had let up during all this. I ended up wishing I'd gone by myself.

You might therefore think I was crazy to try again, but I know that everyone has bad days, and my kids really do like skiing. So after the next blizzard I took my two younger sons (the older one had a cub scouts banquet) to a different trail -- one by the parking lot for a local church, so I didn't have to shovel. I am happy to report that this adventure was much more successful and a lot less noisy. It was my 3-year-old's first time on skis, and he did great. We again had to make our own tracks, and the snow was so deep that the wall left in the middle of the ski trail was as tall as his legs. He got a bit upset when he fell down; the deep snow often got in his sleeves, and once his boot -- which is a hand-me-down and is a bit too large -- came off. But he was a trooper, and when he wasn't falling down he was smiling and enjoying himself.

My two youngest sons and our snowman atop our picnic rock.
We've now been skiing several times, and we've gone sledding. The boys have used their ice skates and have built snowmen. We even built a snowman on top of our favorite picnic rock, which we had to reach by skis! (See photo.) I love snow -- really love it -- and I'm glad winter finally decided to arrive. Truly, I am. But couldn't this snow have all come a bit earlier, when winter was just getting started? You see, the trouble is that now I'm ready for spring.

I've been making my spring fever even worse lately by poring over my foraging books and studying new plants I hope to find this year. And when I'm not reading foraging books, I'm looking at gardening books and planning where I'll plant everything. Yesterday I started some seeds and let the boys each plant their own. We hit the local Agway for seed-starting mix, and the kids each picked out a packet of seeds. My only stipulation was that the seed packet had to say the plants would grow in partial shade or shade (which is what we have at our house). My middle son chose a packet of mixed columbine seeds. There was a drawing of the different flowers on the packet, but it was hard to tell what they really looked like. Still, the package said they'd grow in shade, so we bought them.

Wild columbine
At home I decided to Google columbine to see what the flowers looked like, and I soon realized I'd seen one before. In my May 23 post last year I posted a picture of a pretty, jewel-like flower that hung upside down. I didn't know what it was at the time and figured it wasn't edible, but it was delightful to look at. I'm now almost certain it was columbine, and it turns out it is edible! Although it's related to buttercups, which are mildly toxic, and although columbine's leaves are toxic, the flowers are said to taste slightly sweet and to make a nice addition to a salad. How fortuitous that my son picked that particular seed packet!

Besides planting seeds, playing in the snow, and dreaming about the day it all melts, I've also been making an effort to use up the last of my stored produce from last year. It would be silly to be cooking with, say, frozen pokeweed or Japanese knotweed when I could go pick it fresh outside.I have made several quiches, which were delicious with pokeweed and kielbasa. I made a stir-fry with my frozen milkweed pods, but they weren't as tasty as they had been fresh. It's possible I need to improve my freezing methods (which currently consist of parboiling and then placing the veggies in a ZipLock bag; I'd like to try vacuum sealing). All that's left of last year's foraging in my freezer now is a bag of milkweed shoots and a (rather large) bag of Japanese knotweed. I've been making muffins and coffeecakes with the knotweed from time to time, but it's easy to collect Japanese knotweed in quanity, so I did! We've been enjoying jar after jar of homemade grape, autumnberry, and beach-plum jam, and I gave several jars away around the holidays.

I've also been cracking my black walnuts (a laborious process) here and there and experimenting with them in the kitchen. Black walnuts have an extremely strong taste that overpowers anything they're a part of, and so far I haven't figured out how to use them in a way that really makes me glad I used black walnuts versus the ordinary kind one can buy in the supermarket. I tried some oatmeal cookies, which were good -- but would have been better with other walnuts. I tried some black-walnut fudge, which didn't set properly but would probably make a decent ice-cream topping. And I tried some black-walnut squares, which are sort of like bite-sized squares of pecan pie except with walnuts instead of pecans. I'm not sure what I was thinking when I tried that one: I don't care for the ooey sweetness of pecan pie, and I don't like the walnut squares much, either. My husband loves pecan pie but doesn't care for walnuts, and only one of my sons likes the walnut squares. Fortunately, a friend has been enjoying them for us. Next I plant to try a recipe for black-walnut baklava, which I enjoyed when local foraging expert Russ Cohen gave out samples on one of his guided walks. I thus have high hopes that I can finally find something tasty to do with my walnuts, which is good news because I still have a box full of them.


I used my hazelnuts in a white-chocolate blondie recipe, and the result was delicious except that apparently I got some shell mixed in with my nuts. Ouch. At less than a cup, the quantity of shelled hazelnuts I got from the large bucket of nuts we collected was severely disappointing, though. It probably won't stop me from collecting more hazelnuts next year, but I wish walnuts were as tasty as hazelnuts (or that I could as easily collect large quantities of hazelnuts! The problem is that a significant portion of hazelnuts are wormy and that the nuts themselves are much smaller than walnuts.)

And so the time passes, and sooner or later spring will arrive. I was just remembering that last year our Easter eggs were nestled among some chickweed and wood sorrel -- and Easter is coming right up.