|
| Common violets come in several colors. In my yard, we have mostly blue and purple but also white (shown here) and a few yellow violets. The leaves and flowers are edible and high in vitamin C, but the blue (really purple) violets have the most flavor. I think the white ones are prettiest. |
 |
| Common blue and white violets by the side of my house. |
I cannot believe I once pulled up the edible heart-shaped leaves of the common blue violet as a pesky weed that would just not leave my garden or yard alone. I didn't even let the plants get as far as making their pretty blue (or really purple) flowers if I could help it. For a long time I'm not sure I even realized that the plants
made flowers. Then last year I came across a picture of a blue violet in an edible-plant guide. I stopped and stared in amazement at this "weed" that I'd been unsuccessfully trying to eradicate. You can eat that? And it's high in vitamin C and makes a good salad green? What?
 |
| Violets destined for jelly. |
Needless to say, I'm not weeding violets any more; rather, I've let them take over. Whereas last year it was painstaking work to collect enough flowers to make half a batch of violet syrup (and I had to steal some flowers from my neighbor's yard), this year I had no trouble collecting enough for a full batch
plus an additional 6 cups to make some violet jelly. I'm planning to experiment with using the syrup to flavor various baked items (last year I made some yummy coconut-violet cookies, but I didn't think I could taste the violet flavor).
 |
| Violet jelly. |
The violet jelly turned out to be quite tasty, although the flavor of the added lemon juice overshadowed the violet flavor. I'm not entirely sure the floral tones came through, but I don't know whether the jelly would be acidic enough to can if I had reduced the amount of lemon juice. (The
recipe I used was from The Green Kitchen, although I used fresh lemon juice instead of bottled.) The syrup, which has no lemon juice in it, definitely tasted of violets. I'd like to get a jelly that tastes a bit more like that. Still, the jelly I made was beautiful (the purple violet water turned pink when I added the lemon juice) and delicious.
 |
The young leaves are least fibrous. Younger leaves are furled
or at least a lighter shade of green than the older leaves. |
Yesterday I also collected a colander full of young violet leaves (still furled or at least shiny), cooked them for a minute in the water still clinging to the leaves after I washed them, squeezed out the liquid, and added the leaves to my usual spinach dip in place of the spinach (I use the recipe on the back of a packet of Knorr's vegetable soup mix but replace the sour cream with fat-free plain Greek yogurt). Yum! It was just as tasty as the dip made with spinach, and it was inconsequential that I had no spinach.
 |
A pansy I grew from seed. Pansies are edible and made
beautiful candied decorations. |
I tried making candied flowers for the first time this year. I think I need a little more practice because many of my flowers stuck to the wax paper and crumbled when I tried to lift them off after they'd dried. But many made it into an air-tight container, where apparently they'll still be good a year from now if I haven't used them yet. To candy the flowers, I brushed some beaten egg white carefully onto both sides of the flower with a paint brush and then sprinkled some sifted sugar all over the flower. I candied violets as well as some pansies I grew from seed and some Johnny jump-ups that re-seeded themselves from last year's garden (see the Photo Gallery below).
 |
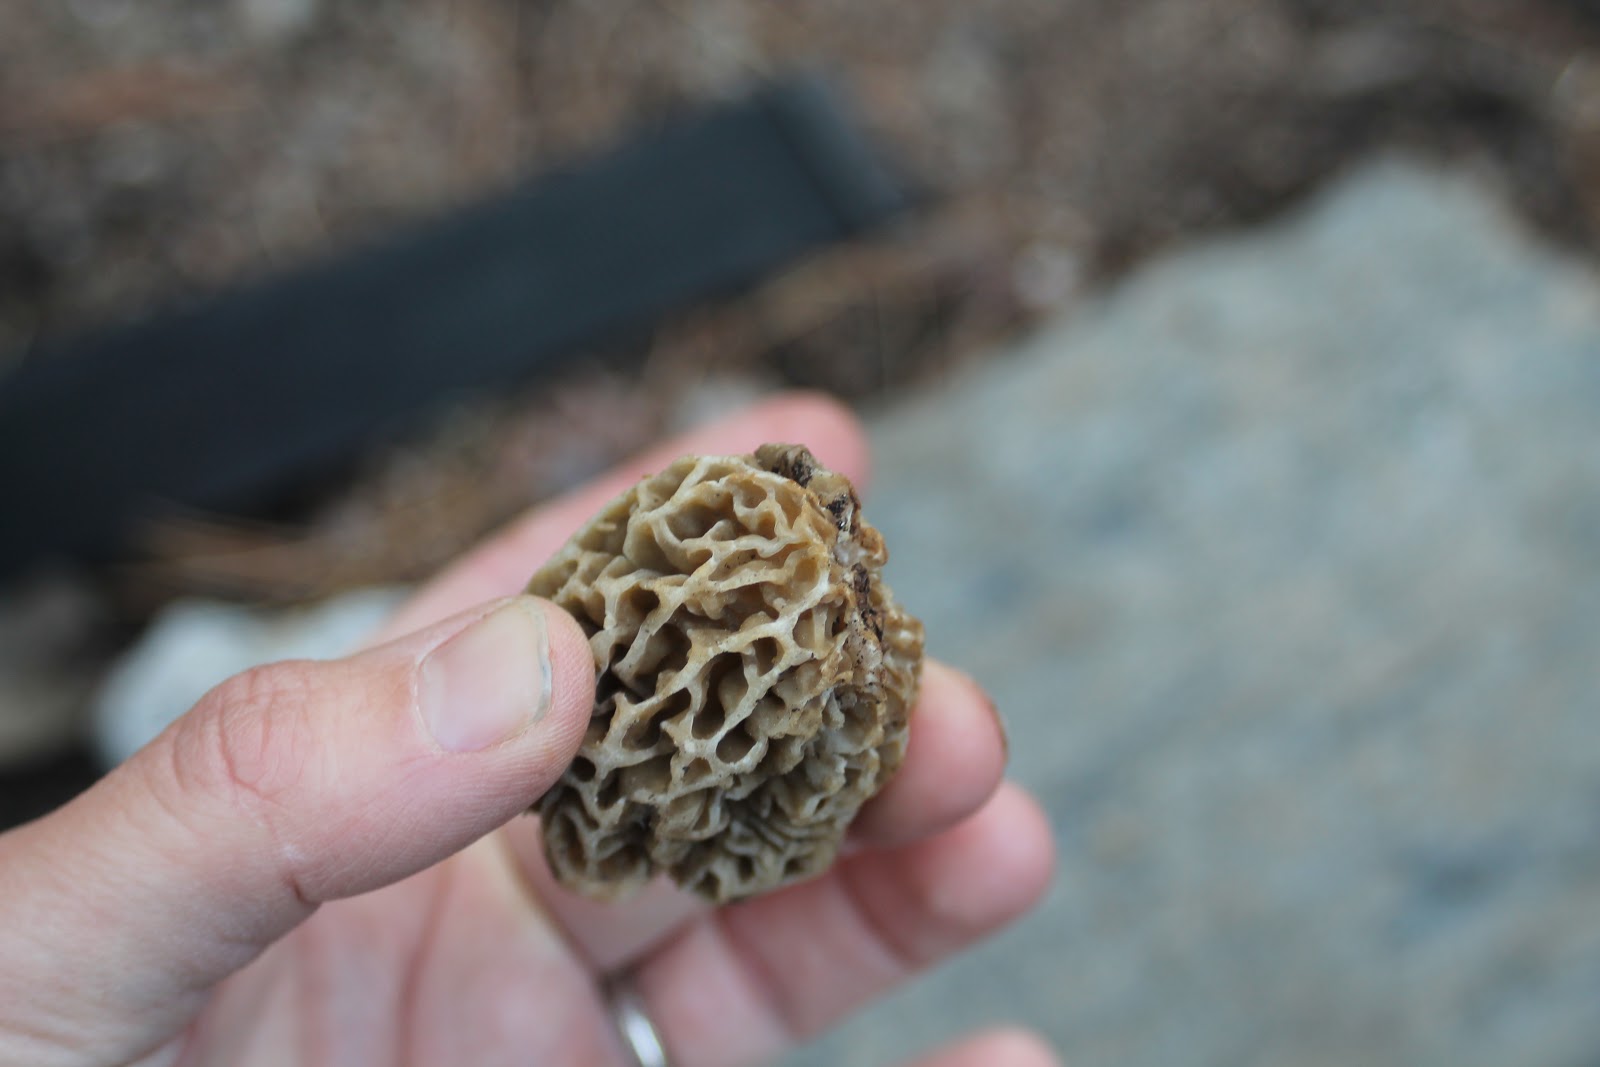
Possible morel mushroom. We had already sliced the mushroom
in half, so here I am holding it back together for the
photo.
Notice the pits that cave in rather than bulging out. |
Violets were expected garden residents, but my 7-year-old recently discovered a much more surprising one. I was showing him something in the garden the other night when he said, "Mom, what's that scary-looking thing behind that blue violet?" I looked and saw what at first I thought was a wasp's nest attached to a violet stem. But it seemed like an odd place for a wasp to build a nest. Upon closer inspection I saw that it was a mushroom, and I got quite excited because it looked an awful lot like a coveted morel mushroom! I admit that I haven't been crazy about morels when I've had rehydrated dried ones, but I know that morels are one of the most sought-after species, and perhaps a fresh morel would be more exciting. In any case, finding an edible mushroom growing right in my own yard would be pretty exciting regardless of taste. My son, who doesn't even like mushrooms as a general rule, obviously agreed. He was practically jumping up and down as he urged me to get my mushroom books.
 |
| Another view of our (pieced-together) mushroom. |
According to my guides, morels usually come up about this time of year, and they often grow under rotting elms or apple trees but sometimes other hardwoods or in compost. This mushroom was growing under a white pine in a place where last year we had spread a bunch of compost, but we don't have any elm or apple trees there. So far so good, except that morels must not be confused with poisonous false morels, which apparently come up at about the same time and like to grow under pine trees. There are different types of false morels. Beefsteak (false) morels have more convolutions, like a malformed brain, whereas true morels are pretty much cone shaped. If you slice the mushroom open, inside a true morel you should see a completely hollow space (including the stem), whereas in a false morel you should see chambers or divisions from all the "brain" lobes. Also, beefsteak morels have convolutions that bulge out, whereas true morels have pits that cave in, just like a wasp's nest.
Verpa false morels look more similar to a true morel, at least to me. They have wavy ridges instead of true pits as the edible morel does. Also, the cap attaches to the stem at the very top (so the stem basically goes up inside the mushroom cap), whereas on a true morel the stem is attached at the base of the cap. If you slice the mushroom in half, a true morel should have one continuous wall from the stem all the way around the cap border. To see pictures to help with all this textual description, visit the
Michigan Morel page.
 |
Our possible morel sliced in half. Note the attachment
of the stem at the base of the cap and the hollow, non-divided
chamber lined with bumps. |
We severed our mushroom at the stem and sliced it open longitudinally. It was hollow and not divided inside, and the inside of the cap was covered with little bumps, just as the guide book said it would be. Everything about the mushroom seemed to fit the description of a true morel -- but given that people have died from eating false morels and that we only had one specimen to examine (and maybe, I thought, if we had let it grow it would have developed chambers inside), we didn't eat it. I'm approaching my entrance into edible-mushroom hunting with great caution -- great excitement, but great caution. It's a lot easier to misidentify a mushroom than a plant, and taste is no guide as to whether one's identification was correct (which is not true for plants).
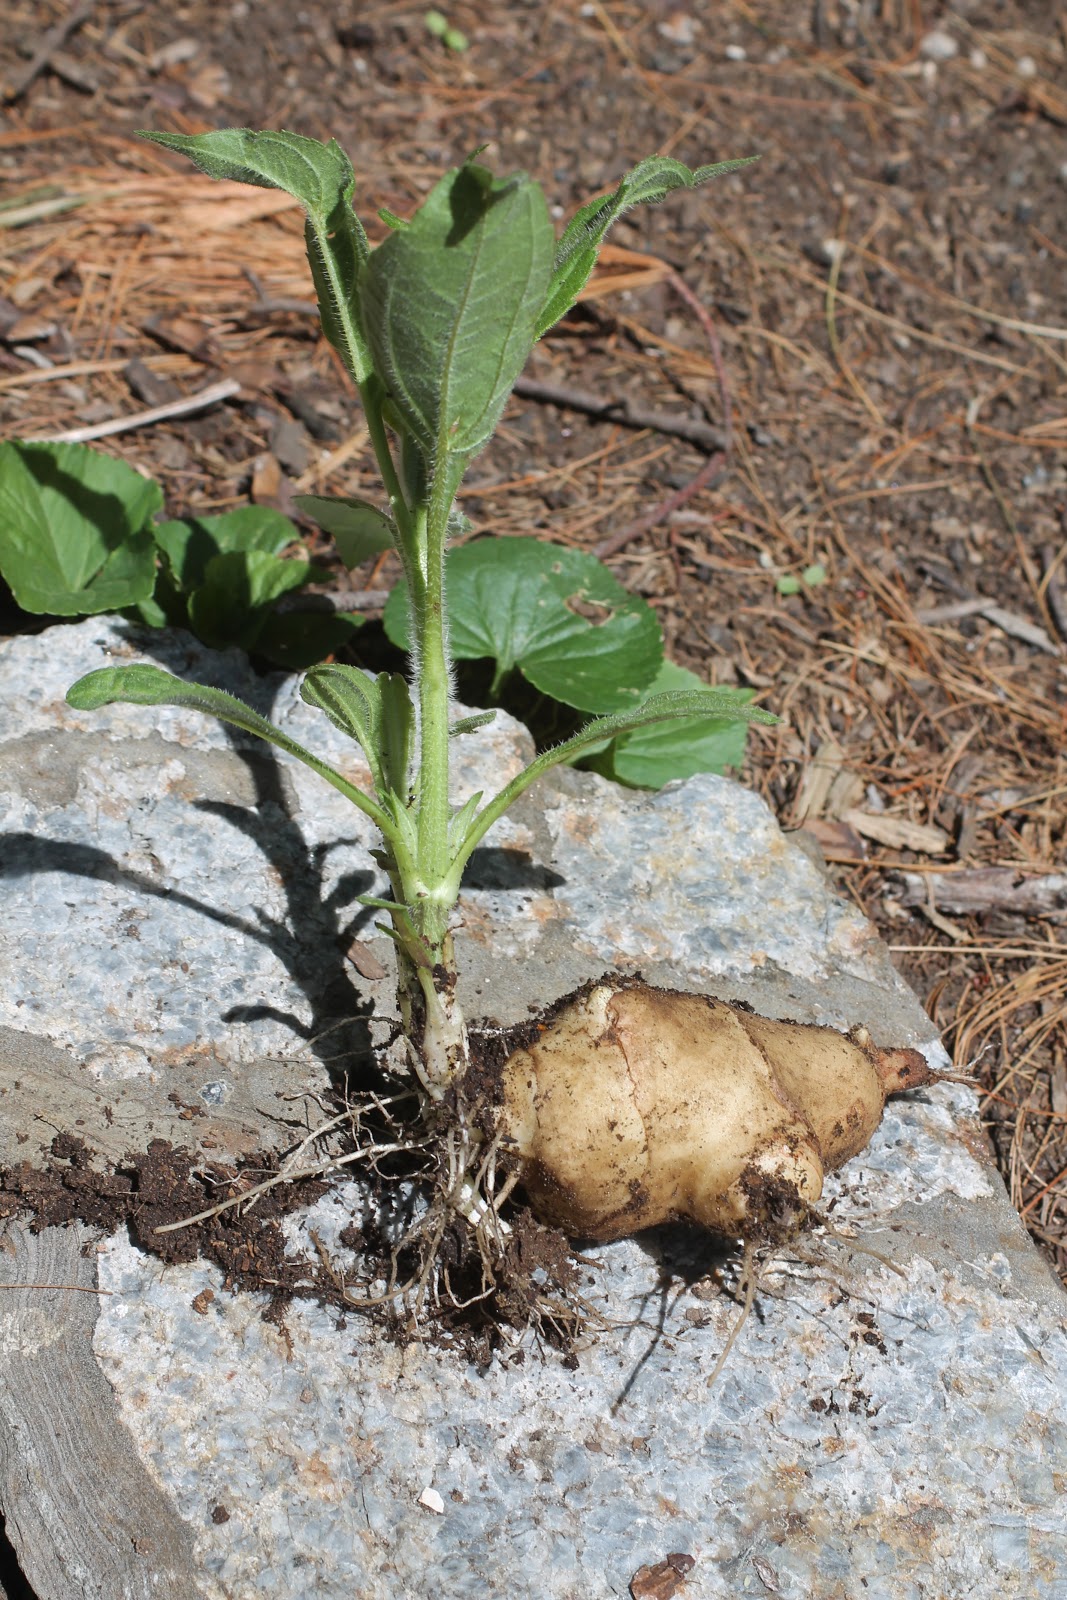
Violets and mushrooms are not the only interesting things popping up in my yard this spring. Last year I planted perhaps six Jerusalem artichoke tubers. Jerusalem artichokes are sunflowers with edible tubers.
I've never actually tasted Jerusalem artichokes, but I hope I like them because I've got a whole lot of
them now! I planted them in cardboard boxes placed in the soil last year because I knew I didn't want
 |
The Jerusalem artichokes that came up after
my initial attempt to dig up all the tubers. |
the location to be permanent, and I wanted to know where I'd planted them later (we don't really have a good, sunny location for sunflowers at our house, but we're building a home that will have a lot more sun). It turns out that my box idea wasn't very effective; my middle son and I dug up quite a few tubers from around where the dead stalks were this spring, and not all of the tubers were within the confines of a box. We thought we had dug them all up, but recently a lot of Jerusalem artichoke sprouts began popping up within a few feet of the original planting spot. And I do mean
a lot. I didn't count the tubers, but I'm sure there were at least 40 of them. Fortunately, I could now see where the tubers were because they were sprouting, so my eldest son and I spent a good part of an afternoon digging them up. Some were the size of small pebbles, and others were more the size of sweet potatoes. I
think we dug them all up, but I'll be keeping a vigilant eye on that section of the yard for a while. I read somewhere that the only sure way to rid oneself of Jerusalem artichokes is to move away from them.
 |
My planters full of Jerusalem artichokes. This was the
second round of planting -- I had already filled
up two other planters (see Photo Gallery). |
Of course, my plan is not to move
away from them but
with them. To that end, I planted many of the tubers in whatever large pots I could find. The problem was, I still had a good deal of tubers left over. I obviously don't really
need so many tubers to start my own little Jerusalem artichoke jungle (given that six turned into 40 or so in just one year), but I didn't want to throw them out somewhere they might take root, either. I thus put them in a gallon-size ZipLock bag with a few handfuls of dirt and put the whole thing in the freezer. I have no idea whether this will work -- during a real winter, the tubers are insulated by a lot more soil. But I figure I've either successfully killed the tubers or saved them for a time when I have enough space and sunlight to grow them. And believe me, I'll be choosing my location carefully because I probably won't be able to change my mind later!
 |
Note the two leaves and the tiny
flower bud on the front plant. |
I've also discovered three additional mayflower plants since my last post. That's a total of six, and one has sprouted a second leaf and is making a flower! Plants with one leaf don't fruit; a second leaf is a sign that a flower is on the way. I'm considering putting a little cage around the two-leaved one to make sure I, and not the wildlife, get to sample the resulting fruit. See my
previous post for more about mayapples.
 |
| Our one lone lilac flower cluster. |
Another exciting discovery was that the sickly lilac bush I purchased from a local nursery at great discount many years ago and planted "temporarily" in an unsuitably shady spot in my backyard has made a flower cluster for the first time ever. I wasn't sure it would ever produce flowers and was wondering whether it was the lack of sunlight or the lack of neighboring lilac bushes, or both, that was the contributing factor (now I'm guessing it's the lack of sunlight because I haven't recently acquired any additional lilac bushes). I've just discovered that lilacs are edible and make nice flowers for candying, so that's an added bonus. My plan had always been to dig up the bush and move it to a sunnier location, and now I guess my plan is for that sunnier location to be at our new house this fall, but the bush has grown considerably since I planted it, so I'm not at all confident I'll be able to dig it up and move it without causing fatal damage. Fingers crossed.
 |
Young lady's thumb plant. You can just see the beginning
of the characteristic "thumb print" on the largest leaf. A young
wild-spinach plant is poking up from the bottom of the picture. |
You might remember from an earlier post that I've been redesigning my front-yard garden and scaling down last year's efforts to a few well-defined planting areas. I'm planning to seed grass outside of these areas, but I'm having trouble taking that plunge because so many delicious edible "weeds" are growing in abundance where I'm planning to put the grass. We have a lot of wild spinach and lady's thumb, for example, and I'd like to collect a good harvest before hoeing it all under. I recently purchased a vacuum sealer to improve my ability to freeze and preserve my harvest, and I have visions of bags and bags of frozen wild spinach. Fortunately, much of the lady's thumb, whose delicate pink flowers I find quite attractive, is growing within the designated "garden" space and won't need to be eradicated.
In closing, I'll report on the results of the experimental dandelion-bud and wintercress quiche that I mentioned was on the horizon in my last post. It got rave reviews from all luncheon attendees! I also made a quiche with stinging nettle, and that was good but was awarded second place.
Photo Gallery
 |
| One of the many Jerusalem artichoke tubers we dug up. |
|
 |
| I planted the initial harvest of Jerusalem artichokes along with some scarlet runner beans in two of these planters. The idea was that the bean vines would climb the sunflowers (Jerusalem artichokes), but so far the growth rate of the beans so far has outpaced that of the sunflowers, so I might need to revise my plan. |
 |
| These Johnny jump-ups freely reseeded themselves from the flowers I planted last year. I've been moving them from their random spots around the yard to the borders of my garden beds. I candied some of these. |
 |
| All six surviving mayapple plants. I can't remember how many I transplanted last year, but I think this might have been all of them. The one that has made two leaves is on the top right. Plants that will make a flower (and hence a fruit) grow two leaves instead of one. |
 |
| Stinging nettle I transplanted from a nearby community garden (not from a garden plot, of course). It's in a pot so I can move it with us to our new house. The stingers cease to have any sting as soon as the plants come in contact with boiling water. I boiled the nettles and used them in a quiche, and I froze the nettle broth for later use. Nettles are high in a number of nutrients, including iron, potassium, sulfur, and vitamins A, B, and C. Apparently they are good for your garden, too (I plan to read more about the uses of nettles when I order 101 Uses for Stinging Nettles by Piers Warren). |
 |
| I saw the idea for this colorful beach-bucket strawberry tower in a book I got out of the library (I can't remember which one now). I planted some green onions among the strawberries in hopes of keeping the chipmunks and squirrels away from my berries (they don't like the onions). |
 |
| Yellow violets are not as common as purple ("blue") and white, at least in my yard. |